
As you've probably noticed, I've been a DIYing fool the last couple of weeks. And man, have I missed it! That "pile" still has a TON of goodies in it. I'll be busting out another project tomorrow.
Until then, here's a quick tutorial of one of my favorite DIY projects. It's a super easy and quick method that renders awesome results.
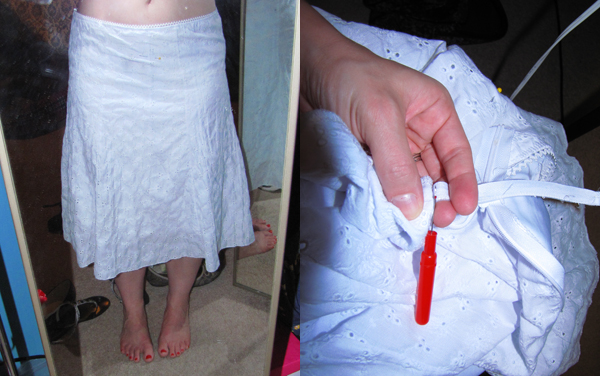
Above is the before picture of my future poufy eyelet skirt that I picked up at Ross for less than $10. FYI, if I wanted to make this skirt from scratch, I couldn't buy the fabric for that little. Anyway, you can see it's kind cute on its own, but it hung too low and was too long, leaving me feeling the "stump and frump." The first step in this case was removing the zipper. Easy enough.
Until then, here's a quick tutorial of one of my favorite DIY projects. It's a super easy and quick method that renders awesome results.
Above is the before picture of my future poufy eyelet skirt that I picked up at Ross for less than $10. FYI, if I wanted to make this skirt from scratch, I couldn't buy the fabric for that little. Anyway, you can see it's kind cute on its own, but it hung too low and was too long, leaving me feeling the "stump and frump." The first step in this case was removing the zipper. Easy enough.
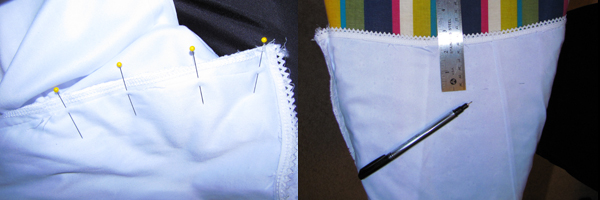
Second, I pinned the seam together where the zipper once was and sewed it up. Then, I actually used a ruler on this one. I measured 2.5" down from the original waistband, marking the measurement all the way around. Once all the markings were done, I put a quick basting stitch along the line. It's a good idea, especially because in this case, I'm working with both the eyelet and a lining at the same time.
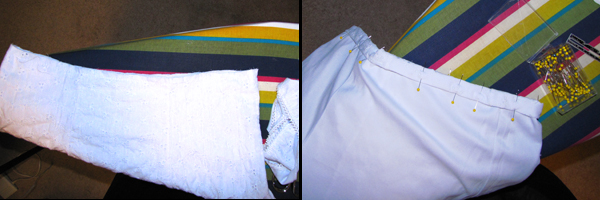
Then, I cut the original waistband off about .25" above the basting stitch. Next, I flipped the skirt inside out and began the elastic casing by turning the edge down .25" and then down again 1", pinning as I went along.

Once the entire edge was turned under and pinned, I lightly ironed it, just to keep everything smooth. Then, I stitched the casing down, getting as close to the bottom fold without going over and leaving a 1.5" opening for the elastic. Using a nifty little tool (or a safety pin would work) on the end of the elastic, I guided the elastic through the casing. Once I had it through, I overlapped the ends about .5" and then stitched them together. Lastly, I stitched the 1.5" opening closed. And voila ...

... a poufy eyelet skirt.
This is the same method I used for the plaid skirt I wore yesterday, only with that one I was cutting the top of the dress off instead of a waistband.
I hope this is helpful! Think you could give it a whirl? If you have any questions, please feel free to email me!
I just need to mail you my pile of stuff I've "hemmed" and have you fix them. I think I can sew...then I remember, I really can't! I'm a dork. :) I like the skirt! You'll get a lot of mileage out of it!
ReplyDeleteI tried doing this the other day, but I was clueless as to how to get the elastic through. Now I know!
ReplyDeleteTotally amazed. Totally intimidated. Totally looking up some sewing classes to attend. Honestly, I thought basting was only for turkeys. This is sad.
ReplyDeleteI LOVE this!! U have inspired me to try this!!! Thanks Kyla :)
ReplyDeleteThis is a great tutorial! You're much better than I am about taking pictures - I usually forget until the project is almost done.
ReplyDeleteHi there, thanks for posting such a great tutorial!
ReplyDeleteI'm currently writing up a post featuring tutorials I've found on the net, do you mind if I feature yours?
thanks again,
www.miss-brightside.com
Jen - I'd love it if you included this in your upcoming post. Just give me credit and I'm cool. Can't wait to see it! Thanks so much!
ReplyDeletethis is a great tutorial! the skirt looks so cute in the after photo. love the eyelet fabric. i'm going to have to try this next time i get a too-big skirt- usually i resort to safety pins ;) ~joelle
ReplyDeleteHey!
ReplyDeleteI finally got round to posting up my features on DIY tutorials.
It should be the first post on my website (it has a new layout too yay!).
Hope you like it :)
jeni
www.miss-brightside.com
Oh you make me want to run to the thrift store and buy skirts in sizes too big for me to make into dresses and tunics. Thank you for the post.
ReplyDelete